The biggest obstacle standing between nonprofits and increased revenue is rarely donor unwillingness. Instead, it is often a simple lack of awareness regarding matching gift eligibility. If your supporters do not know these programs exist, they cannot participate, leaving significant funding unclaimed.
In this guide, we will outline an omnichannel marketing approach designed to close this gap. From optimizing your website to launching targeted email campaigns, we will demonstrate how to leverage fundraising software and donor stewardship to turn passive donors into active workplace giving participants.
1. How can my nonprofit promote matching gifts to donors?
You can promote matching gifts through an omnichannel marketing strategy. This involves the following:
- Email outreach is a vital component of online fundraising, with multiple ways to engage supporters. Your nonprofit can send digital newsletters, thank-you emails, and dedicated match emails or follow-ups. These follow-up emails can include information targeted for each donor, providing company-specific details regarding the next steps and submission forms. This can help nudge eligible donors to submit matching gift requests to their employer and double their donation’s impact.
- Your nonprofit’s website is the centralized hub for all information regarding your cause and how to get involved. Create a dedicated matching gift page to give donors a centralized resource to learn about matching gifts. Incorporate matching gift statistics or annual matching gift figures. Embed a matching gift database to make it easier for donors to check their eligibility.
- Social media platforms are powerful tools for fundraising pushes and engagement opportunities. Incorporate eye-catching graphics with short and sweet captions, hashtags, and more. Then, link to the dedicated matching gift page on your site from these posts so donors can learn more.
- Market matching gifts directly within your donation process. Contextualize your request for employer data as a means of determining match eligibility status. Then, highlight matching gift eligibility on your donation confirmation screen. Using a matching gift tool to provide automated insights based on the employer a donor selected on the previous page streamlines this process. With a dedicated tool, you can give donors access to company specific insights, like minimum and maximum donation amounts, match ratios, qualifying nonprofits, employee types, and direct links to online submission forms.
2. Where should nonprofits place matching gift information on their website?
Key placements include donation forms, pop-ups, thank-you screens, dedicated matching gift pages, and your donation process. Embedding a fundraising search tool like Double the Donation can help you improve the visibility of matching gift information. By integrating effective automation software and providing step-by-step instructions, you can encourage donor submissions and maximize workplace giving revenue.
3. How can my nonprofit use email campaigns to boost matching gift submissions?
To boost matching gift submissions, your nonprofit can:
- Send automated emails and matching gift promotions to donors immediately after they make their donation. Ensure that your outreach includes instructions and a link to search for eligibility via a fundraising tool like Double the Donation.
- Follow up with reminders for donors who haven’t submitted.
- Segment campaigns for high-value donors or company-specific matches.
This allows you to re-engage supporters while their donation is fresh and giving momentum remains high.
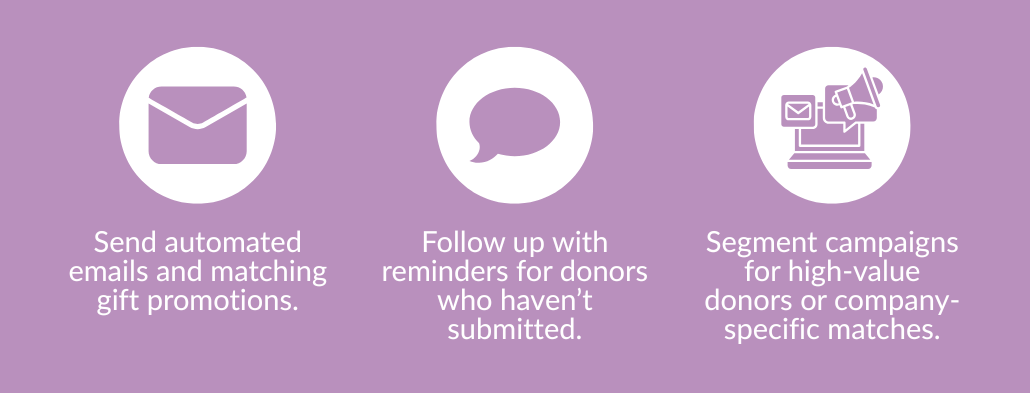
How your nonprofit can use email campaigns to boost matching gift submissions
4. How can my nonprofit combine matching gifts with volunteer programs?
The most effective way to combine these programs is to treat a donor’s employment information as a “multi-purpose key.” Many corporations bundle their corporate social responsibility (CSR) initiatives, meaning a company that offers matching gifts is highly likely to also offer corporate volunteer grants or paid volunteer time off (PVTO).
Therefore, the strategy begins with data collection. When a supporter provides their employer’s name (whether during a donation checkout or a volunteer registration) you should not limit your screening to just one type of opportunity. Instead, you should ensure that you check for every available program that the company offers.
Here is how to turn that data into a cohesive strategy:
- Comprehensive screening: When you capture a company name (e.g., “Microsoft”), use your fundraising software to query the database for all workplace giving programs. You will often find that the same company offering a 1:1 donation match also offers a monetary grant (e.g., $25 per hour) for time spent volunteering.
- Cross-pollinated outreach: Once you know a supporter works for a company with a volunteer grant program, you can target your subsequent outreach specifically to them. instead of sending a generic “Come Volunteer” email, you can send a targeted message: “Did you know [Company Name] will donate to us if you volunteer 10 hours this month?”
- Unified promotion: Specialized fundraising tools, like Double the Donation, allow you to promote these opportunities simultaneously. After a donor makes a gift, the automated follow-up can highlight their matching gift eligibility and inform them about available volunteer grants, effectively doubling the potential engagement points from a single interaction.
By validating all available programs upfront, you ensure that you are maximizing the revenue potential of every corporate partnership in your database.
5. How can my nonprofit use storytelling to increase matching gift submissions?
Effective storytelling bridges the gap between a corporate policy and a human impact. To drive submissions, you must move beyond the technical definition of a match and illustrate the tangible outcome of that extra revenue.
Here are three storytelling strategies to increase participation:
- Visualize the multiplier effect: Start by highlighting the difference a match makes in program impact and share examples. Instead of saying “Your gift will be matched,” say “Your $50 provides one semester of supplies. With a match, that same contribution supports two students for the entire term.”
- Leverage social proof: Feature testimonials from supporters who have successfully submitted a match. A short quote or video from a peer saying, “It only took me five minutes to log into my portal and double my donation,” is often more convincing than a set of instructions from your staff.
- Celebrate the hidden heroes: In your newsletters and impact reports, explicitly recognize “corporate matched donors” as a distinct category of supporter. By publicly celebrating these individuals, you create a social incentive for others to check their eligibility and join that group.
6. How can staff and volunteers support matching gift programs?
Your staff can mention matching gift programs during donor calls, events, or volunteer orientation:
- In regular communications such as email newsletters, internal meetings and social media channels, consistently remind staff and volunteers about available programs.
- On your website, create a dedicated matching gift page with easy-to-follow, step-by-step guides on how to submit a matching gift request through their employer’s platform. Provide links to corporate portals or databases that list eligible companies and their specific guidelines.
Training your nonprofit team on effective fundraising tools can help your team guide supporters effectively and ensure consistent messaging across outreach.
7. How can nonprofits measure the success of matching gift campaigns?
To measure the success of your matching gift campaigns, your nonprofit should:
- Track conversion rates, submission numbers, and total matched revenue
- Monitor company-specific trends and monthly remittance reports to identify new match-eligible donors
- Check email engagement rates to help refine communication strategies
- Compare year-over-year match capture rates to refine strategies
By integrating a fundraising tool like Double the Donation, you can get access to these insights and analytics to inform outreach timing, messaging, and targeting.
Promoting Matching Gifts to Increase Donor Participation
Effective promotion of a matching gift program requires consistency across every touchpoint in the donor journey. By weaving these opportunities into your storytelling and digital presence, you not only secure immediate funds but also open the door to broader corporate volunteering and payroll giving conversations.
We encourage you to audit your automated donation receipts this week. Ensure they contain a clear call to action for matching gifts, as this single adjustment is often the highest-leverage step toward increasing your fundraising results.
To learn more about promoting matching gifts and other forms of workplace giving, explore more resources from Double the Donation and implement best practices, streamline processes, and capture more matching gifts today.